Woohoo...I got my package in the mail today from the Mini Album Scraps Altered Clothespin Swap. What beautiful clothespins I received. Such very talented ladies...Millicent Marshal, Michelle McLean, and Patria Flowers. Thank you so much ladies for the beautiful clothespins. Now to show you just what I received...drum roll please...
My daughter-in-law's mother came down to Florida last October to celebrate her 65th birthday with her daughter. We had a good time and since it was her 65th birthday I wanted to make her a mini album to document her memories. It is a paper bag mini album with chipboard covers and I used grunge board for the spine. I used Recollections Night of Fall paper and I used vintage photo to distress all the edges. And I also distressed the bags to bag them a bit darker to match everything else. But of course I couldn't leave well enough alone. I had decided since she is a non-crafter it would be more difficult for her to store the album because I had decorated the top with all those beautiful flowers and leaves so I decorated a Paper Mache box to store the album in. I used up some of my stash making this album which I love because I have a lot.
When I did the video I had to rush through it because YouTube only gives you 15 minutes unless you go through some process to have longer ones. Since I am new to doing videos and to blogging I figured I did not want to do that at this time. Maybe later on when I am more experienced. I hope she enjoys this album and box. There are plenty of places for her and her daughter to journal and they can add more photos in the pockets.
I had decided to join my very first swap. I'll be honest, I was a little nervous about it. Was my work going to be good enough? Was it too flimsy? Wonder if they don't like it? All kinds of negative things running around in my head. But I realized I will never know until a take the plunge and I can't get better if I don't work at it. Amazing how that pertains to everything in life. So I joined an easy swap on Mini Album Scraps. Since I work a lot I don't have a lot of time to devote to my crafting endeavors so I needed to do a swap that I could do in my spare time. I went to the site and seen a swap for altered clothespins. You had to do 3 sets of 3 altered clothespins. I thought that shouldn't take too much time to accomplish so I took the plunge.
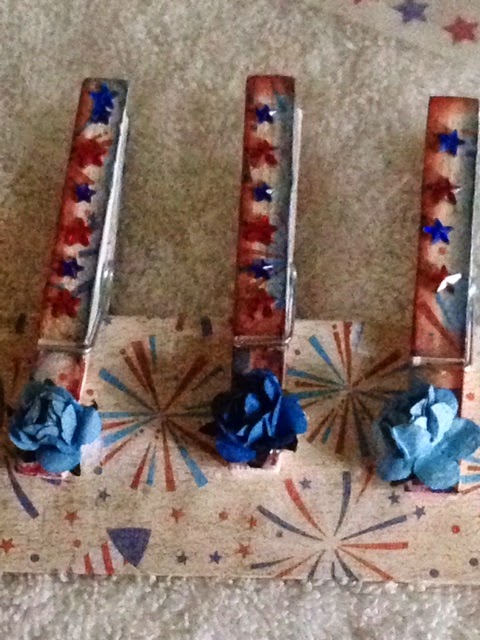
I took the clothespins apart and used Gesso on them. Then I used Marion Smith's Garment District design paper to cover the clothes pins on both sides and put the clothespins back together. I distressed the edges lightly with antique linen. On some I punched a hole in the top of the clothespin and added some charms. On some others I used a wood veneer butterfly that I stained with pickled raspberry and on the last ones I used a little crocheted doily flower with a paper rose on top. I thought they came out pretty good.
I also made an extra one for each recipient as an added gift. I used a beach/summer type paper, added a charm, and then little acrylic dots that look like little water drops. I had a lot of fun making these and now I have all kinds of ideas running through my mind for later. Can't wait to see what everyone else makes.
I got my first manufacturer box! I heard others talk about getting a Prima box or a G45 box but I had never seen where you get them. Well I was on Facebook the other day and seen where Prima had a box for sale. It was $39.99 and you got $100.00 worth of products and it included the shipping costs. So I got my first box and wow...what a fun bunch of products. I can't wait to make something with it. Here is video of what all I got. Sorry it isn't that good but I don't have a video camera so I have to use my phone.
I belong to Facebook group called "Will Craft for Supplies." Recently in this group their was a challenge posted to make a project using nothing but scraps and the winner would receive some stencils. I did the challenge and made a little 3x3 mini album which you can see in an earlier post. I was actually chosen! I can't believe it! I entered thinking it was a good challenge for me to get something accomplished. Never dreaming I would actually win something. Then on top of that, this past Saturday was National Scrapbook Day. I did some challenges which you can also see in an earlier post. I had uploaded them to nstagram and of all people who commented on one of my layouts was Heidi Swapp herself! I couldn't believe it. What an honor and surprise. I know it might not seem like a lot to some people and others might say big deal but to me it was. When someone you admire says something good about what you are doing it should not be taken lightly but use it has encouragement to continue working hard at what you do.
Anyway, I get home yesterday and the package from challenge was in the mail box. It was quite thick and I was like hmm...this doesn't seem like stencils. Well I'm not going to spoil the surprise but you can watch the video and see what I got! :-)
I have seen several videos on YouTube on how to make homemade enamel dots. Some say use pony beads and others say use Perler beads while others use a liquid paint product. So I decided to test the beads to see how well they work. I must say they worked very well. I used my oven at 400 degrees and used parchment paper. Unlike using the liquid paint where you have to wait until it dry, these are ready to use within minutes of coming out of the oven. In the video you will see the difference and how well they come out. Upon further use I discovered that the pony beads are shiner and a bit harder than the Perler beads but I did not test the more metallic type Perler beads. Also you will notice in the picture with the two dots that they are a little different although they are both pony beads. The longer you leave them in the oven the flatter they get. So if you want some that are small but more domed take them out as soon as they are melted. If you want them flatter and a bit bigger then leave them in a bit longer.
The nice thing is you can big tubs or bags of these from your local Michaels or JoAnns and use your 40 or 50% coupons to make this a great value! Check out the layout that I made for a challenge for National Scrapbook Day; those pretty enamel dots are the pony beads! Now I have a container full of different sized dots just waiting for another project!
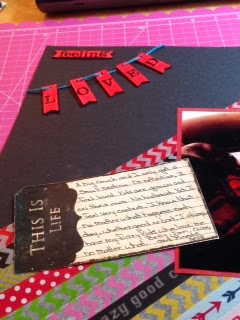
Hope everyone had a wonderful and productive day on {Inter}National Scrapbooking Day! In between errands and running to the next town twice to take care of my son's dogs while he is away I actually got 4 single page layouts done and one double page. I did the scrapbook.com challenges so it made me not over think my layouts and just try to get them done. A great way to jump start your creative juices to flowing. The five layouts correspond with five different challenges. One challenge was to use Instagram size photos, one was to use a rainbow of colors of one item, one was to use pocket pages, one was to use at least 10 cut-outs/punch-outs, and one was to use a template with and type of medium like mists, matte medium, etc. So here are my pages: